 |
In't
Westy's Brilliant ! |
|
| Praying
for dry weather ?
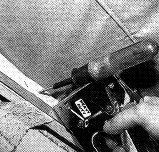
Staple away, slow and sure |
Starting in front, fold the top
flap under, align the center mark on the canvas with the mark on the poptop and staple in
place. Now go to the rear of the top and do the same there. The amount of material that
you fold under determines the fit of your top. For best results, we recommend that you
only bring the canvas about half way down the wood before stapling. We used a heavy-duty
manual stapler, with 3/8-inch staples . . . it offered great results Work your way from the center and staple to the sides, taking up slack
in the corners. Only staple every six-inches or so at this point, as the canvas may need
some adjusting, which would require removing the staples.(fig 5) Make sure the plastic strips are all the way up against the
top (this gives the canvas that "fitlook" from the inside} and then place a
staple every couple of inches. We found it necessary to go back over the staples with a
hammer to ensure that they were all the way down-that plastic is tough stuff. |
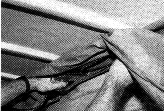 (fig 5)
|